Aftercare gets a fraction of the attention we give the procedure itself. In lip micropigmentation, that gap is where a smooth, unremarkable recovery can turn into something alarming. Often, nothing went wrong during the procedure. What went wrong happened at home, in the days after.
Why Lip Micropigmentation Heals Differently
Lip tissue behaves differently from brow or scalp skin during healing, and that difference drives most of what aftercare needs to account for. The vermilion is thinner, its keratinization pattern is different, and it lacks the protective barrier skin has elsewhere on the face. It's also under constant mechanical and chemical stress that other micropigmentation sites never face. Saliva keeps the area intermittently wet, softening the healing crust and prolonging the time it takes to seal. Eating, drinking, and speaking flex and stretch the tissue dozens of times a day, and a crust that could stay still and dry on skin elsewhere gets pulled and cracked here instead.
Related: RescueMD's Restorative Lip Treatment Hydrates Lips & Boosts Collagen Production
Clients add their own layer of mechanical stress on top of that, usually without realizing it. Some purse or press their lips out of habit, which compresses the healing tissue in a way ordinary speech doesn't. Others bite, whether from nerves or because the area feels strange while it heals, and biting is the more damaging habit: it can reopen the crust, introduce bacteria from the mouth, and leave uneven pigment loss where the bite lands. Naming these habits at intake, and asking clients to watch for them during the healing window, heads off a disproportionate share of the trouble I see.
Thinner tissue, more moisture, more movement, and habits that add mechanical stress on top of it all: together, that's why lips crust on their own schedule, why pigment retention here is harder to predict than on brow or scalp, and why aftercare built for those areas doesn't simply carry over.
Where It Goes Wrong: What Clients Do at Home
This is the part I see cause the most trouble, and it rarely has anything to do with the procedure itself. Left on their own, clients improvise. They don't clean the area properly between applications, then layer whatever is in the house on top of what's already there: petroleum jelly, lip gloss, moisturizing creams, sometimes an antibiotic or anti-inflammatory ointment left over from something else entirely.
Related: Lip Flips with Botox Can Fix Gummy Smiles
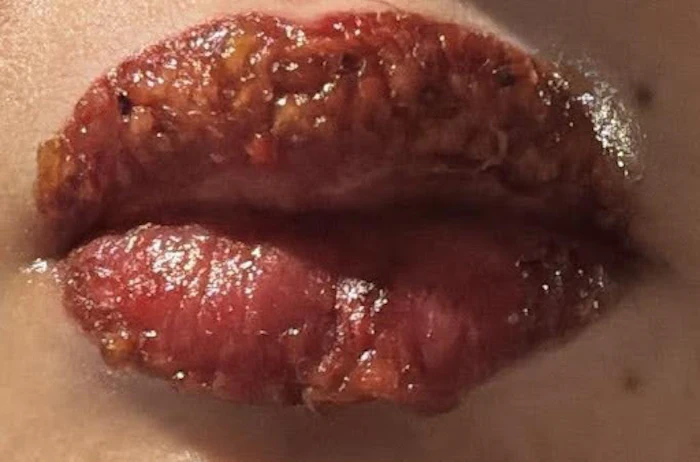
Each layer traps the one underneath it. What should be a thin, even healing crust turns into a thick, uneven buildup, and the result can look far more dramatic than what's actually happening underneath it.
 Exaggerated, layered crusting from at-home product buildup — dramatic in appearance, but consistent with routine rather than infection.
A Note on Product Guidance
To be clear, this isn't a list of banned ingredients — it's a principle, and aftercare guidance reasonably varies by pigment system, technique, and practitioner training. What matters is indication. A petroleum-based product made for intact, healthy skin isn't automatically fine on micropigmented skin, because what we're working with is a field of microinjuries. If a product's own label excludes broken or wounded skin, that exclusion holds here too.
Two more practical filters help narrow the choice: skip heavily fragranced products, which tend to irritate healing tissue, and skip anything containing an ingredient the client is known to react to, even mildly. In practice, that means reaching for something labeled safe for compromised skin, light on fragrance, and clear of that client's known allergens.
What to Use, and For How Long
The same logic that shapes what to avoid also points to what to use. Look for a neutral, non-lightening balm formulated for skin that's actively recovering, not for cosmetic hydration on intact skin, with nothing brightening or exfoliating in the formula. Apply it at least two to three times a day, and keep that pace up for as long as any crust is still visible; once the crust is gone, the routine can stop.
Cleaning comes before each application, not instead of it. Before reapplying, wipe away whatever balm is still on the surface from the last application—this keeps the layer thin and even instead of building up the way improvised routines do. Saline solution, applied gently with gauze or a fiber-free cotton pad without rubbing, is enough to clear both leftover product and any debris before the next application. Rubbing or scrubbing works against the goal — it disturbs the crust rather than simply clearing what's sitting on top of it.
Discomfort and Discharge as Signals
Clients who heal without complications tend to feel the procedure more than the recovery — most describe the days after as sensation rather than pain. When discomfort shows up or worsens during healing, that's a more specific signal, roughly proportional to whatever infection or complication is present, and it's this pattern, not how dramatic the crusting looks, that should prompt a closer look.
The same goes for fluid along the crust. A clear or pale, watery discharge is simply the tissue releasing fluid as it repairs, and on its own it isn't cause for concern. What changes the read is its character: thick, colored, or foul-smelling discharge points toward infection rather than routine healing.
Evidence-based guidance on lip micropigmentation healing timelines is still thin. Much of what circulates has been generalized from other micropigmentation sites or passed along informally between practitioners, which is part of why concrete benchmarks are worth having.
When It's Not Routine Healing
Because the lips are a classic site for herpes simplex reactivation, ask directly about a history of cold sores at intake. It isn't disqualifying — it's a reason for closer monitoring and, where indicated, coordination with the client's physician before the procedure. A reactivation tends to look different from routine healing: grouped, fluid-filled vesicles instead of diffuse flaking, often with burning or tingling before any lesion appears. That presentation calls for a referral rather than in-house management.
An allergic reaction to pigment usually shows up later than expected, sometimes days to weeks after the procedure rather than in the immediate post-procedure window, as localized swelling, itching, or redness that keeps building instead of settling. If it's spreading or not easing within a day or two with basic measures, see a physician or dermatologist rather than keep monitoring at home.
Bacterial infection tends to bring the discharge changes and rising pain covered earlier, often with redness spreading past the treated area rather than staying contained. Spreading redness, escalating pain, or discharge that turns thick or foul-smelling are the signals to refer promptly rather than wait and see.
One habit worth naming directly for clients: reaching for leftover antibiotics, their own or someone else's, at the first sign of redness, without medical guidance. Self-medicating this way can mask a presentation the practitioner needs to see clearly, and the wrong antibiotic, an incomplete course, or one that doesn't match the actual cause can delay real treatment and complicate things further. Any suspected infection belongs with a referral, not a home fix.
None of this asks the practitioner to diagnose. It asks them to notice when a presentation has stopped matching the expected healing pattern, and to have somewhere to send the client when it does.
What a Thorough Anamnesis Should Actually Cover
A pre-procedure intake for lip micropigmentation should go beyond general health history and cover, specifically:
- Previous reactions to pigments, cosmetics, or topical products, including reactions to prior micropigmentation elsewhere on the body
- History of cold sores or herpes simplex, including frequency and typical triggers
- Current medications, particularly anticoagulants, retinoids, or immunosuppressants
- Any active lip irritation, infection, or unhealed lesion at the time of consultation
- Previous lip procedures — fillers, prior micropigmentation, surgery — and how the tissue responded to each
- Personal or family tendency toward keloid or abnormal scarring
- Relevant medical history, including autoimmune conditions or anything known to affect wound healing
- Expectations around color correction or touch-ups, since pigment retention and final tone vary by skin type, technique, and healing pattern
Each of these shifts something concrete: candidacy, the aftercare plan, or how the practitioner reads the healing process, not simply whether to move forward. Treating intake as paperwork, rather than as the moment these variables surface, is usually where a preventable complication starts.
Before You Pick Up the Needle
- Screen for a history of cold sores or herpes simplex, and coordinate with the client's physician when indicated.
- Give clients a specific, written aftercare routine — cleaning with saline, a neutral healing balm applied two to three times a day until the crust is gone, and nothing improvised on top.
- Explain product selection by principle: safe for broken skin, low in fragrance, and free of known allergens.
- Walk clients through what normal secretion, crusting, and even significant pigment loss can look like, so they're not alarmed by something expected.
- Set expectations for the healing and color timeline through day 21, and for the pain curve—steady improvement is normal; pain that keeps building past day three is not.
- Warn explicitly against self-medicating with leftover antibiotics or other products not indicated for the case.
- Have a referral pathway ready for anything outside your scope.
The technique gets the training and the attention. The days that follow, and what the client does with them, deserve the same.